[Salesforce]active-section-name

active-section-name

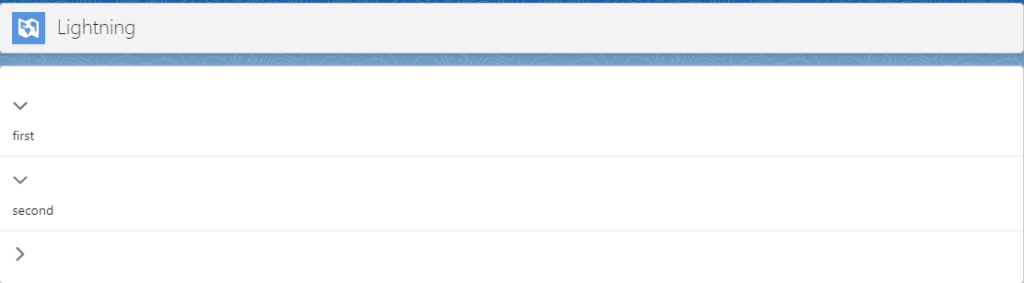
最初から複数のセクションを開いておくには active-section-name に配列を渡します。 

<lightning-accordion active-section-name={open}
                     allow-multiple-sections-open>
    <lightning-accordion-section name="1st">first</lightning-accordion-section>
    <lightning-accordion-section name="2nd">second</lightning-accordion-section>
    <lightning-accordion-section name="3rd">third</lightning-accordion-section>
</lightning-accordion>

import { LightningElement } from 'lwc';

export default class Accordion extends LightningElement {
  open = ['1st', '2nd'];
}

[Salesforce]active-section-name

active-section-name

<template>
    <lightning-card>
        <lightning-accordion active-section-name="B">
            <lightning-accordion-section name="A" label="Accordion Title A"
                >This is the content area for section A</lightning-accordion-section
            >
            <lightning-accordion-section name="B" label="Accordion Title B"
                >This is the content area for section B</lightning-accordion-section
            >
            <lightning-accordion-section name="C" label="Accordion Title C"
                >This is the content area for section C</lightning-accordion-section
            >
        </lightning-accordion>
    </lightning-card>
</template>

[Salesforce]lightning-accordion

lightning-accordion

An accordion allows a user to toggle the display of a section of content.

<template>
    <lightning-card>
        <lightning-accordion>
            <lightning-accordion-section>Accordion details - A</lightning-accordion-section>
            <lightning-accordion-section>Accordion details - B</lightning-accordion-section>
            <lightning-accordion-section>Accordion details - B</lightning-accordion-section>            
        </lightning-accordion>
    </lightning-card>
</template>

[Salesforce]lightning-card

lightning-card

cardとは

コンテナです。 タイトル、アクション、フッタを持たせることができます。

例)

<template>
    <lightning-card>lightning-card</lightning-card>
</template>

Lightning アプリケーションビルダー

> 新規

> アプリケーション

> 表示ラベル:Lightning

> 1つの画面

カスタムの一覧から、fontSampleを追加

保存

有効化

保存

完了

戻る

アプリケーションランチャー

> Lightning

<template>
        <lightning-card  title="Hello">
            <lightning-button label="New" slot="actions"></lightning-button>
            <p class="slds-p-horizontal_small">Card Body (custom component)</p>
            <p slot="footer">Card Footer</p>
        </lightning-card>
</template>

[CSS]What is !important?

What is !important?

The !important rule in CSS is used to add more importance to a property/value than normal.

Example
<!DOCTYPE html>
<html>
<head>
<style>
#myid {
  background-color: blue;
}

.myclass {
  background-color: gray;
}

p {
  background-color: red !important;
}
</style>
</head>
<body>

<p>This is some text in a paragraph.</p>

<p class="myclass">This is some text in a paragraph.</p>

<p id="myid">This is some text in a paragraph.</p>

</body>
</html>

<!DOCTYPE html>
<html>
<head>
<style>
#myid {
  background-color: blue !important;
}

.myclass {
  background-color: gray !important;
}

p {
  background-color: red !important;
}
</style>
</head>
<body>

<p>This is some text in a paragraph.</p>

<p class="myclass">This is some text in a paragraph.</p>

<p id="myid">This is some text in a paragraph.</p>

</body>
</html>

[CSS]CSSのidとclassの使い分け[CSS]

CSSのidとclassの使い分け

HTML
<h1>こんにちは</h1>
<p class="red">私の名前は田中太郎です</p>
<h1>こんにちは</h1>
<p class="blue">私の名前は田中次郎です</p>
<p id="green">よろしくお願いします</p>

CSS
h1 {
  color: orange;
}
.red {
  color: red;
}
.blue {
  color: blue;
}
#green {
  color: green;
}

[Tools]wgetコマンドをWindowsで使う方法

wgetコマンドをWindowsで使う方法

wgetをダウンロードして解凍

上記のリンクへアクセスして、「Download」まで画面をスクロールします。「Binaries」と「Dependencies」の右側にある「Zip」をクリックします。するとこの2つのファイルをPCへダウンロードできます。

エクスプローラーを開いてPCからCドライブを開きます。Cドライブに新しいフォルダを作ります。フォルダの名前は自由に付けて大丈夫です。今回は「Tools」というフォルダを作ってみました。

新しいフォルダを作成出来たら、先ほどダウンロードした解凍した2つのフォルダを新しいフォルダに移動します。新しいフォルダにファイルを移動出来たら、「wget-1.11.4-1-bin」のフォルダの名前を「wget」に変更します。

次に、「wget-1.11.4-1-dep」の中の「bin」に入っている4つのファイルをコピーして、「wget」に名前を変更したフォルダの中の「bin」に移動します。

タスクバーに表示されている検索窓に「環境変数」と入力して検索します。検索結果から「環境変数を編集」をクリックして開きます。

Path」をクリックしてから「編集」をクリックします。

新規」をクリックします。「新規」をクリックします。「C:\Tools\wget\bin」と入力して「OK」をクリックします。これでwgetが利用できるようになりました。

コマンドプロンプトが開いたら、「wget」と入力してEnterキーを押します。wgetが起動すればインストールができています。