[C言語]PCでgccコンパイル環境構築から実行までの流れ

PCで環境構築から実行までの流れ

gccコンパイラダウンロード

https://sourceforge.net/projects/mingw-w64/files/Toolchains%20targetting%20Win64/Personal%20Builds/mingw-builds/8.1.0/threads-posix/sjlj/x86_64-8.1.0-release-posix-sjlj-rt_v6-rev0.7z/download

ダウンロードしたのを展開します。

システム環境変数Pathに、展開先が以下のフォルダの場合、以下のように追加します。

C:\Users\PC\Downloads\x86_64-8.1.0-release-posix-sjlj-rt_v6-rev0\mingw64\bin

コマンドプロンプトでgccバージョン確認します。

gcc –version

c言語ファイルを作成します。

ファイル名:test.c

#include <stdio.h>
 
int main(void) {
    char str1[12] = "Hello World";
    char str2[10] = "Yokkaichi";
    printf("%s  ", str1);
    printf("%s\n", str2);
 
    return 0;
}

test.c保存先へ移動します。例)保存先が、c:\gcc\test.cの場合

gccでコンパイルします。

実行ファイルを実行します。

[Windows]システム環境変数の設定ができなくなった場合の対処

システム環境変数の設定ができなくなった場合の対処

PowerShell管理者で Start C:\Windows\system32\rundll32.exe sysdm.cpl, EditEnvironmentVariables と入力

手順

  1. スタートメニューを右クリックして、Powershell(管理者)を呼び出す。
  2. コマンドで、コントロールパネルの環境変数の設定 を実行する
Windows PowerShell
Copyright (C) Microsoft Corporation. All rights reserved.

新しいクロスプラットフォームの PowerShell をお試しください https://aka.ms/pscore6

PS C:\WINDOWS\system32> Start C:\Windows\system32\rundll32.exe sysdm.cpl, EditEnvironmentVariables

[Salesforce]Salesforceのディスク容量の計算

Salesforceのディスク容量の計算

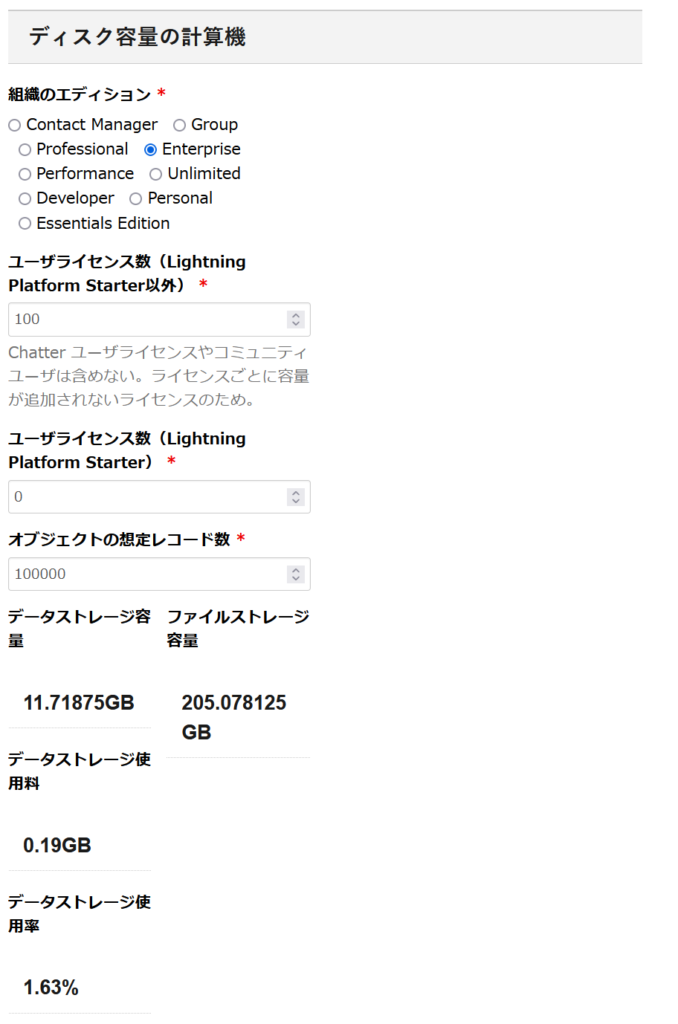
組織のエディションとユーザライセンスの数によってディスク容量は決まります。

計算式は「組織のエディションによって決まる固定ストレージ」+「ユーザライセンス数にして比例して追加されるストレージ」です。

データストレージはオブジェクトのレコードを格納する容量です。

Salesforceでは一部のオブジェクトを除いて1レコード2KBです。

データストレージの容量と組織で使用を想定しているレコード数が分かれば、容量が十分かどうかを確認することができます。

ファイルストレージは関連ファイルなどにアップロードするファイルを格納する容量です。

ファイルストレージ容量と組織で扱うファイル数・サイズが分かれば、容量が十分かどうかを確認することができます。

[Salesforce]Lightning Web ComponentからApex呼び出し方法

Lightning Web ComponentでApex呼び出し方法

■LWCから呼び出せるApexメソッド

条件

  @AuraEnabledがついていること

  staticであること

  publicもしくはglobalであること

例)

Apexクラス作成します。

testController

public with sharing class testController {
    @AuraEnabled
    public static List<test__c> getRecord( String str ){
        return [
                SELECT
                 Id,
                 Name
                FROM test__c
                Where Name = str
            ];
    }
}

■LWCからApex呼び出し

・Javascript

testLwc.js

import { ShowToastEvent } from "lightning/platformShowToastEvent";
import { CurrentPageReference } from "lightning/navigation";
import getRecord from '@salesforce/apex/testController.getRecord';

export default class testLwc extends LightningElement {

 @api recordId;

  @wire(CurrentPageReference)
  async getStateParameters(currentPageReference) {
    //ScreenActionの場合、レコード詳細画面でLightning Web コンポーネントアクション押下時のレコードID取得
    this.recordId = currentPageReference.state.recordId;
    //Apexクラスメソッド呼び出して、レコード取得
    const rows = await getRecords({ recordId: this.recordId }).catch((e) => {
      console.error(e);
   //dispatchEventメソッドでカスタムイベントをディスパッチし、親コンポーネントに伝達します。
      this.dispatchEvent(
        new ShowToastEvent({
          title: "エラーが発生しました。",
          message: e.body.message,
          variant: "error",
        })
      );
    });
  }

}

・xml

testLwc.js-meta.xml

<?xml version="1.0" encoding="UTF-8"?>
<LightningComponentBundle xmlns="http://soap.sforce.com/2006/04/metadata">
    <apiVersion>56.0</apiVersion>
    <isExposed>true</isExposed>
  <targets>
  <target>lightning__RecordAction</target>
  </targets>
  <targetConfigs>
    <targetConfig targets="lightning__RecordAction">
      <actionType>ScreenAction</actionType>
    </targetConfig>
  </targetConfigs>
</LightningComponentBundle>

・html

testLwc.html

<template>
        <lightning-quick-action-panel header="test">
            ここにモーダルコンテンツを記載する
            <div slot="footer">
                <lightning-button variant="neutral" label="ボタン1" class="slds-m-left_x-small"></lightning-button>
                <lightning-button variant="brand" label="ボタン2" class="slds-m-left_x-small"></lightning-button>
            </div>
        </lightning-quick-action-panel>
</template>