[Salesforce]vscodeでSalesforce開発のための準備

vscodeでSalesforce開発のための準備

1. Visual Studio Codeインストール

https://code.visualstudio.com/download


2. Visual Studio Code拡張機能「Salesforce Extension Pack」インストール


3. Visual Studio Code拡張機能「Salesforce Package.xml Generator Extension for

VS Code」インストール


4. Salesforce CLIインストール

https://developer.salesforce.com/ja/tools/sfdxcli

ダウンロードした sfdx-x64.exe または sfdx-x86.exe を実行します。 

[Salesforce]TestMethod として定義されたメソッドは、Web サービスコールアウトをサポートしません。

TestMethod として定義されたメソッドは、Web サービスコールアウトをサポートしません。

エラー発生した例

@isTest
private class PostTest {
    @isTest
    static void test() {

        Test.startTest();
        Service.execute();
        Test.stopTest();
    }
}

public with sharing class Service {
  @future(callout=true)
  public static void execute() {
    ServiceC sc = new ServiceC();
    sc.post();
   }

}

public with sharing class ServiceC {

  private HttpResponse post() {
    HttpRequest request = new HttpRequest();

    (省略)

    HttpResponse response = new Http().send(request);

    return response;
  }

}

エラー解消例

@isTest
private class PostTest {
    @isTest
    static void test() {

        Test.startTest();
        Test.setMock(HttpCalloutMock.class, new ServiceHttpCalloutMock());
        Service.execute();
        Test.stopTest();
    }
}

@isTest
public class ServiceHttpCalloutMock implements HttpCalloutMock {
  public HTTPResponse respond(HTTPRequest req) {
    HttpResponse res = new HttpResponse();
    res.setStatusCode(200);
    res.setBody('test');
    return res;
  }
}

[Server]vscodeでjsonサーバーインストール、起動、postmanツールでリクエスト

vscodeでjsonサーバーインストール

Viewタブ > Terminal

PS C:\xx> npm install -g json-server

added 340 packages in 10s

107 packages are looking for funding
  run `npm fund` for details

PS C:\xx> npm install

added xx packages, and audited xx packages in 13s

xx packages are looking for funding
  run `npm fund` for details

found 0 xx

jsonサーバー起動

Viewタブ > Terminal

PS C:\xx> npm run local

> xx@1.0.0 local
> json-server ./data/db.json --config json-server_local.json


  \{^_^}/ hi!

  Loading ./data/db.json
  Loading routes.json
  Done

  Resources
  http://localhost:3000/api-auth

  Other routes
  /api/auth* -> /api-auth$1

  Home
  http://localhost:3000

  Type s + enter at any time to create a snapshot of the database
  Watching...

postmanツールでリクエスト

POST

http://localhost:3000/api/xx

BODY raw {}

{
    "xx": {
        "xx": {
            "xx": {
                "content-type": "text/plain",
                "user-agent": "PostmanRuntime/x.xx",
                "accept": "*/*",
                "postman-token": "xx",
                "host": "localhost:3000",
                "accept-encoding": "xx",
                "connection": "keep-alive",
                "content-length": "2"
            }
        }
    }
}

[soracom]sandbox環境に架空オペレータ作成、IoT SIM作成と登録

sandbox環境に架空オペレータ作成、IoT SIM作成と登録

ステップ 1: Sandbox に架空のオペレーターを作成する

コマンド:

soracom configure-sandbox

レスポンス:

— SORACOM CLI setup (Sandbox) —

This will create a directory /root/.soracom if it does not exist yet and place ‘sandbox.json’ in it.

Please select which coverage type to use.

1. Global

2. Japan

select (1-2) > 1 or 2

Please Specify a pair of AuthKeyID and AuthKey for the production environment to check if you have a valid account on it.

authKeyId: keyId-xx

authKey:secret-xx

Please Specify Email and Password for a sandbox account to be created.

email: hoge@xx.xx

password:xx

コマンド:

soracom operator get –profile sandbox

レスポンス:

root@daeheui:/mnt/c/Users/daehe# soracom operator get –profile sandbox

{

        “createDate”: “yyyy-mm-ddThh:mm:ss.sss”,

        “email”: “hoge@xx.xx”,

        “operatorId”: “xx”,

        “updateDate”: “yyyy-mm-ddThh:mm:ss.sss”

}

ステップ 2: 架空の IoT SIM を作成し登録する

コマンド:

soracom sandbox subscribers create –profile sandbox –coverage-type jp \

–body ‘{

  “subscription”: “plan-D”

}’

レスポンス:

{

        “apn”: “soracom-sandbox.io”,

        “iccid”: “xx”,

        “imsi”: “xx”,

        “ipAddress”: “xx”,

        “moduleType”: “micro”,

        “msisdn”: “xx”,

        “operatorId”: “xx”,

        “plan”: 1,

        “registrationSecret”: “xx”,

        “serialNumber”: “xx”,

        “sessionStatus”: {

                “online”: 0

        },

        “simId”: “xx”,

        “subscription”: “plan-D”,

        “tags”: {},

        “type”: “s1.standard”

}

コマンド:

soracom subscribers register –profile sandbox –coverage-type jp \

–imsi xx \

–body ‘{

  “registrationSecret”: “xx”

}’

レスポンス:

{

        “apn”: “soracom-sandbox.io”,

        “createdAt”: xx,

        “createdTime”: xx,

        “expiredAt”: null,

        “expiryAction”: null,

        “expiryTime”: null,

        “groupId”: null,

        “iccid”: “xx”,

        “imeiLock”: null,

        “imsi”: “xx”,

        “ipAddress”: “xx”,

        “lastModifiedAt”: xx,

        “lastModifiedTime”: xx,

        “lastPortMappingCreatedTime”: null,

        “moduleType”: “micro”,

        “msisdn”: “xx”,

        “operatorId”: “xx”,

        “packetCaptureSessions”: null,

        “plan”: 1,

        “registeredTime”: xx,

        “serialNumber”: “xx”,

        “sessionStatus”: {

                “dnsServers”: null,

                “imei”: null,

                “lastUpdatedAt”: xx,

                “location”: null,

                “online”: false,

                “ueIpAddress”: null

        },

        “simId”: “xx”,

        “speedClass”: “s1.standard”,

        “status”: “ready”,

        “subscription”: “plan-D”,

        “tags”: {},

        “terminationEnabled”: false,

        “type”: “s1.standard”

}

[soracom]soracom-cliをWindowsのwslにインストール

soracom-cliをWindowsのwslにインストール

soracomのAPIを呼び出すコマンド

環境情報

  • Windows11
  • WSL バージョン: 1.2.5.0
  • SORACOM API client v1.1.0

Download

wget https://github.com/soracom/soracom-cli/releases/download/v1.1.0/soracom_1.1.0_amd64.deb

Install

sudo dpkg -i soracom_1.1.0_amd64.deb

soracom version

SORACOM API client v1.1.0

[Salesforce]Lightning Web Component @wire decorator

Lightning Web Component @wire decorator

Sample

//js

import { LightningElement, wire } from 'lwc';
import { getRecord } from 'lightning/uiRecordApi';
import ACCOUNT_NAME_FIELD from '@salesforce/schema/Account.Name'; 
const FIELDS = [ACCOUNT_NAME_FIELD];

export default class LwcWire extends LightningElement {

    @wire(getRecord, { recordId: '0016T00002zj9rlQAA', fields: FIELDS})
    accountRecord;

    get NameOfAccountRecord() {
        if(this.accountRecord.data) {
            return this.accountRecord.data.fields.Name.value;
        }
        return null;
    }

}
//html

<template>
    <lightning-card>
        name : {NameOfAccountRecord}
    </lightning-card>
</template>
<?xml version="1.0" encoding="UTF-8"?>
<LightningComponentBundle xmlns="http://soap.sforce.com/2006/04/metadata">
    <apiVersion>58.0</apiVersion>
    <isExposed>true</isExposed>
    <targets>
        <target>lightning__RecordPage</target>
    </targets>
</LightningComponentBundle>

Result

[Salesforce]Lightning Web Component @tract decorator

Lightning Web Component @tract decorator

Sample

//LwcTrack.js
import { LightningElement, track } from 'lwc';

export default class LwcTrack extends LightningElement {
    @track
    parsonObj = {
        name : 'test',
        age : 1
    };

    @track
    parsonObjList = [
        {name : 'listtest1', age : 11},
        {name : 'listtest2', age : 12},
        {name : 'listtest3', age : 13},
    ];

    handleChange = function(event) {
        this.parsonObj.age =  event.target.value;
        this.parsonObjList[0].age = event.target.value;
    }

}

<!-- lwcTrack.html -->
<template>
    <lightning-card>
        <div>
            objname : {parsonObj.name}
            objage : {parsonObj.age}
        </div>

        <template for:each={parsonObjList} for:item="parsonObj">
            <div key={parsonObj.name}>
                objListname : {parsonObj.name}
                objListage : {parsonObj.age}
            </div>
        </template>

        <form>
            <lightning-input type="number" default=40 onchange={handleChange}>

            </lightning-input>
        </form>

    </lightning-card>
</template>

<?xml version="1.0" encoding="UTF-8"?>
<LightningComponentBundle xmlns="http://soap.sforce.com/2006/04/metadata">
    <apiVersion>58.0</apiVersion>
    <isExposed>true</isExposed>
    <targets>
        <target>lightning__RecordPage</target>
    </targets>
</LightningComponentBundle>

Result

・Default

Input : 99

[Salesforce]Lightning Web Component @api decorator

Lightning Web Component @api decorator

Sample

js (HowToUseVariables)

import { LightningElement, api } from 'lwc';

export default class HowToUseVariables extends LightningElement {
    @api
    childAge;
}
html (HowToUseVariables)

<template>
    <lightning-card>
        childAge : {childAge}
    </lightning-card>
</template>
js-meta.xml (HowToUseVariables)

<?xml version="1.0" encoding="UTF-8"?>
<LightningComponentBundle xmlns="http://soap.sforce.com/2006/04/metadata">
    <apiVersion>58.0</apiVersion>
    <isExposed>true</isExposed>
    <targets>
        <target>lightning__RecordPage</target>
    </targets>
</LightningComponentBundle>

js (Parent)

import { LightningElement, api } from 'lwc';

export default class Parent extends LightningElement {
    @api
    parentAge;

    handleChanges(event) {
        this.parentAge = event.target.value;
    }
}
html (Parent)

<template>
    <c-how-to-use-variables child-age={parentAge}></c-how-to-use-variables>
    <lightning-input type="number" default=40 onchange={handleChanges} label="parentAge"></lightning-input>
</template>
js-meta.xml (Parent)

<?xml version="1.0" encoding="UTF-8"?>
<LightningComponentBundle xmlns="http://soap.sforce.com/2006/04/metadata">
    <apiVersion>58.0</apiVersion>
    <isExposed>true</isExposed>
    <targets>
        <target>lightning__RecordPage</target>
    </targets>
</LightningComponentBundle>

Result

Default

Input Value at Parent

[Salesforce]Lightning Web Component wiredRecord

Lightning Web Component wiredRecord

The wiredRecord function receives a stream of data from this wire service. The record data is then returned in the data argument. Any errors are returned in the error argument.

Samle

js

import { LightningElement, api, wire } from 'lwc';
import { getRecord, getFieldValue } from 'lightning/uiRecordApi';
import NAME_FIELD from '@salesforce/schema/Account.Name';
export default class AccountSummary extends LightningElement {
    @api recordId;
    accountName;
    data;
    error;

    @wire(getRecord, { recordId: '$recordId', fields: [NAME_FIELD] })
    wireRecord({ data, error}) {
        if (data) {
            this.accountName = getFieldValue(data, NAME_FIELD);
            this.data = data;
        } else if (error) {
            this.error = error;
        }
    }
}

html

<template>
    <lightning-card>
        <div>
            <template if:true={data}>
                Account Name : {data.fields.Name.value}
            </template>
        </div>
    </lightning-card>
</template>

js-meta.xml

<?xml version="1.0" encoding="UTF-8"?>
<LightningComponentBundle xmlns="http://soap.sforce.com/2006/04/metadata">
    <apiVersion>58.0</apiVersion>
    <isExposed>true</isExposed>
    <targets>
        <target>lightning__RecordPage</target>
    </targets>
</LightningComponentBundle>

Result

[JavaScript]Learning JavaScript with VS-Code

Learning JavaScript with VS-Code

Download and install VS-Code

https://code.visualstudio.com/

Extensions to check operation

Live Server

Let’s create a project

index.html
<html>
<head>
	<meta charset="UTF-8">
</head>
<body>
	<h1>Hello HTML!!</h1>
	<script src="main.js"></script>
</body>
</html>

main.js
console.log("Hello JavaScript!!");

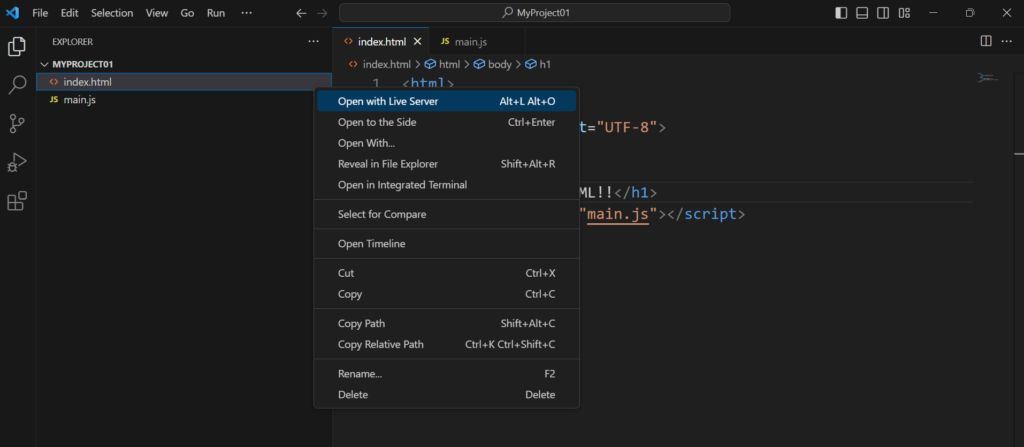
Operation confirmation

index.html > Open with Live Sever